

Automating deployment offers the ability to move any software between production and testing environments with the help of automated processes. With this automation, it will be possible to do dependable and repeatable deployment across the software delivery cycle.
When you automate deployment, you can release new applications and features at a faster pace and at regular intervals. It even helps you get rid of human intervention when deploying applications.
When you take the case of website admins, developers and SEO professionals, they work together in most instances to make sure that they achieve the best return on investment. Above all, they wish to achieve it with minimal time-intensive tasks. It is possible to achieve this impact from a simple yet effective task of backend metadata optimization. This holds particularly for contextually organized data.
Search engine optimization experts always look for ways to grab the attention of search engines such that they can rank a client’s website with ease. For this purpose, they look for a quick refresher and organized data. Here, Schema implementation can help them achieve dynamic media and rich snippets to relate to their listing on search engine result pages. When a website appears in a rich snippet in SERPs, it can lead to increased engagement with organic search results. Even though theoretically it sounds great, marketing teams often talk about challenges they face when highlighting implementation and maintaining schema.
Here, let us find a remedy to this issue. We will outline a framework ideal for automating not only deployment but also the development of the article schema on blog posts. However, the thing to remember here is that when you make changes to the base script, you can generate a sturdy stream of different structured types of data across different page types on your website. Now, your question will be whether to use plug-ins available for this purpose. But here are some reasons for not using plugins:
Why are Plugins Not Effective?
You might think that plugins are easy to use. Nevertheless, just for ease of use when you opt for a plug-in to implement schema, you will often end up facing issues like those mentioned below:
- Indeed, plug-ins are nice to have. But they are not needed as they do not offer any universal support for non-standard types of schemas.
- Third-party applications might need you to work with many people to build the schema integration. The return on investment of taking development time and marketing ops on schema is a never-ending battle.
- Plug-ins with unwanted subscription costs without any documentation or human support can turn out to be a waste of time and money.
In some cases, a plug-in can be a good option as well. For instance, when your organization is small and does not have internal developer support, you can consider using a plug-in. In the same way, if your organization has a lean marketing team with a website or SEO manager alone, you can consider using a plug-in.
On the other hand, if you are thinking about scaling your website with heavy content and you look for an easy technique for the generation of different schema types, using the CMS API offered by HubSpot will be the right choice. Also, if you are sceptical about page layout or if you look for an initial framework that you can expand upon for the inclusion of extra types of schemas, the HubSpot CMS API will be the best choice. The reason is that it will help with automated scheme generation and deployment.
Module – Things To Know:
When it comes to the implementation of schema, a module can provide a scalable solution. You might think that it would be easy to opt for a one-stop deployment by running the script. Also, you might think that logistics for working within multiple web properties with various page constructions will need module edits frequently. In reality, at the end of the day, you can find different ways to get things done and this framework is one of the effective techniques.
Framework Establishment:
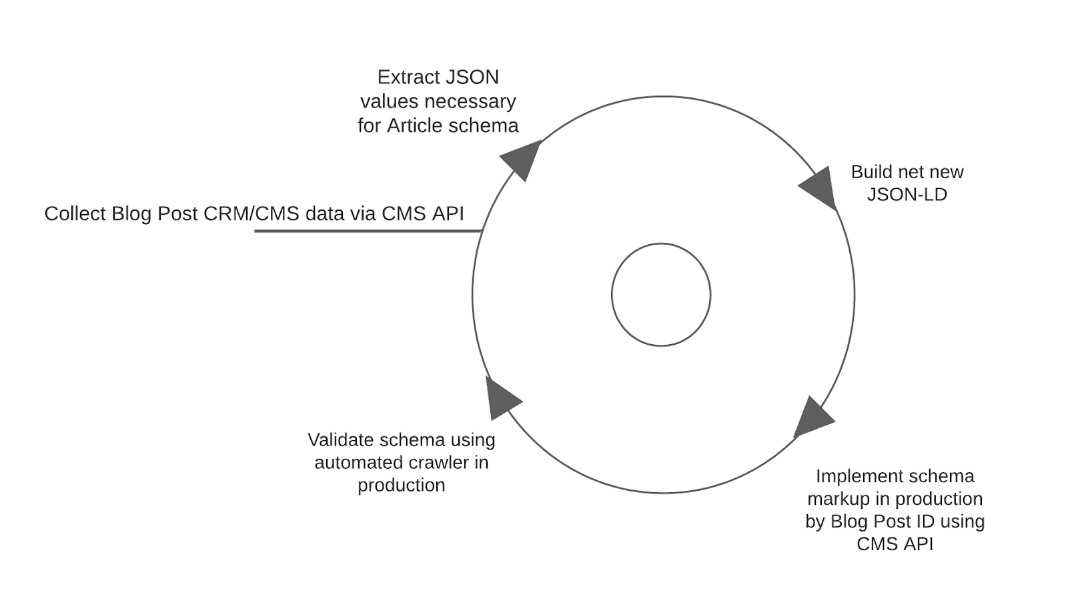
You might be aware of the requirement for a cyclical framework for the collection, sourcing, implementation and tracking of the data. From the picture below, you can understand the ‘always on’ nature that will enable this to happen.
How To Use the CMS API for Automated Scheme Development and Deployment?
To begin, you will need the libraries listed below in Python:
- HubSpot: You should have the authentic HubSpot Python API Software Development Kit
- Genson: You should have a JavaScript Object Notation schema-developing library
- You will also require some key necessities that come with any Integrated Development Environment in Python like time, requests, JSON and Pandas.
Gathering the Correct Data:
When it comes to collecting data, you can follow different techniques. You can do this data collection either straight from HubSpot or through API Call.
Here, let us consider that you choose to gather all data from HubSpot API. You should gather all details required for developing your Article Schema at this phase.
In case, you have not done it earlier, you might wonder how to get your HubSpot API Key. You can get this information from HubSpot Blog content for developers.
As against employing the HubSpot API SDK, you can call this process blog post API endpoint with the help of demands. This will help you with easy access. The thing to remember here is that HubSpot blog post API comes with a 100-post restriction. Due to this rule, we will connect over iterations of 100 still we gather details from each post in your page. In this case, we will understand how to gather information from a website with nearly 1000 blog posts.
When we go through every iteration, we will analyze the JSON response for appropriate information for our scheme that encompasses feature image, date modified, date published, description, author and title of every article. After we gather every element, we will store the data in a dictionary and pass them to a list. In turn, it will be easy to build a DataFrame. When the connection comes to an end, we will get in touch with all our articles into a sole DataFrame.
Building the Article Schema:
To build structured data in Python, we will use a framework. The function in the picture below uses the same kind of elements as a function.
When you gather what is required using the HubSpot API, you will continue to show interest to manually bring together extra elements that you will require to make the article schema valid:
.png)
Now, you have the schema outlined after you have gathered all data in one place. It is now time to iterate over DataFrame and develop the schema in a fresh column. Here, you will have to employ an F-String to ensure that you keep the JSON-LD Script Tag ready before adding a post
Implementation:
Now, you have built the scheme. You have the option to input the schema straight into the HTsML head of your blog post. When you use the HubSpot API Wrapper, you can make the authentication required to make the POST Request easily. For this purpose, you will have to take an ID that you gathered from your first HubSpot API Call and your schema that you built recently and iterate over the whole DataFrame. Make sure to include a sleep timer. This will help you make sure that the loop will not timeout because of the API rate restrictions in HubSpot.
Validation:
You know the importance of quality in any task you do. Here, with quality in your mind, you will be interested in ensuring that the script has pushed valid structured data to your webpage successfully. To do this, you can conclude the automated loop with the help of a third-party crawler. Using this crawler, you can get into the site.
One third-party crawler that can do this for you is Screaming Frog. With this crawler recognized across the industry, you can configure it to run a crawl after the deployment is completed. In case, you are using Windows, you can use the .exe of this crawler Otherwise, you can set up a configured crontab file. When you run this on Python, you can gather structured data from the site. You can also store the outcomes in BigQuery or SQL Database. After this, you can match values that are valid back to the posts in your blog.
You should remember that you can also do this manually with the help of the Screaming Frog. This typically relies on the scale of your automation efforts side-by-side to the scale in which your site deploys and modifies posts.
Always-on Push:
Let us consider that your site has a huge velocity of content. Otherwise, let us consider that your site regularly gets through A/B testing on descriptions or pages. In these cases, you can set the script to a scheduler so that it can be fired off daily.
An easy method you can follow for packaging this script is by running the script as a .py file. For this purpose, you can use the Crontab on Map or Windows Task Scheduler if your system is Windows- based. AWS Lambda is another option available to run a scheduler.
Conclusion:
Now, after you do these things mentioned above, your Article Schema will be live on-site. It will stay prepared for validation with the help of the selected toolset. To be short, this process is an excellent option in case, you wish to make sure of quick implementation of wins. But, remember that you might be pressurized by time and lack of resources.
